Managing User Ids and Passwords
Two local CMBHS roles manage user IDs: the local Security Administrator and the User Administrator. In this section of CMBHS Online Help, the term "local Security Administrator" refers to both roles.
The local CMBHS Security Administrator has the ability to create User IDs. If the local CMBHS Security Administrator creates the User ID, she or he must ensure that it is done in a consistent manner using a naming convention similar to that used by CMBHS.
User Account Status
Initiated – The CMBHS Security Administrator has set up an account for this person, created a user name, and entered a temporary password. The user has never logged in to CMBHS.
Enabled – This is the status of a user who has logged in to CMBHS at least one time.
Disabled – The user’s account is closed and the user can no longer access CMBHS. The account can be reset to Initiated by the CMBHS Security Administrator.
USER IDs – If you, as the local CMBHS Security Administrator, create the Email (Which will be used as user id to login through IAM Online), you must ensure that it is done in a consistent manner for all users within the business entity.
Duplicate Emails
- If you are creating account and Email: In case the user has multiple accounts with same email address (duplicate email), with the new functionality of having unique email address, user will need to have email addresses with Alias. E.g., test.lisa+1@test.com, test.lisa+2@test.com, test.lisa+3@test.com
Security Administrator Created User IDs
User Accounts and Access
The following instructions will assist the CMBHS local Security Administrator in adding staff accounts to CMBHS.
Only CMBHS users with the role of CMBHS local Security Administrator or CMBHS User Administrator can add new users to CMBHS. The assignment of CMBHS roles to a business entity’s staff must be a collaborative effort between the Security Administrator and the organization’s management.
Decisions to grant or deny staff access to certain CMBHS functions and protected health information (PHI) must be based on the person’s job responsibilities documented in a written job description, must be approved by a high level manager, and the manager’s approval must be documented with a signature.
Every person given access to CMBHS must have received training and demonstrated competency in issues related to protected healthcare information (PHI) and maintaining security of the CMBHS system.
Before You Start
On the Find/Add Staff page, use the Search function to find a staff person before you create a new account for that staff member. This will avoid creating duplicate records.
Using these search criteria — first name, last name, title, office phone, and email address — enter the staff member information in the text boxes provided.
Make sure that you CLICK the check box for "Display Staff with Disabled Status." Selecting this will return search results that include all staff.
Have all the information on hand that you will need to add or update staff accounts in CMBHS. This will make the process more efficient, as you cannot Save a new staff account in Draft or Incomplete status. The information must be entered and successfully saved in one session.
You will need the following information to successfully create a new staff account:
- Title
- Name
- Date of Birth
- Office Address
- Office Phone
- All locations the person should be given access to
- The location to be designated as primary
- Roles to be assigned at each location
- The role to be designated as primary at each location
- Credentials (if the user is assigned a role that requires credentials) including Begin and End Date
- For LMHAs, whether or not to grant the View LMHA Network
NOTE: Social Security Numbers are no longer accepted or required as a user account identifier. Social Security Numbers previously entered into the system have been permanently deleted.
How to Add New Staff to CMBHS
In CMBHS, you can access the Add New Staff page in two ways.
From the Administrative Toolbar at the top of every page of CMBHS, hover over Account Management and then select Find/Add Staff.
From the Provider Setup and Location Detail pages, a New Staff button is provided in the upper right corner of the page.
Add New Staff from the Administrative Toolbar
- From the Provider setup page, CLICK on the Find/Add Staff button.
- Verify that the Provider Location is correct for the staff you will add.
- On the Administrative Toolbar, CLICK on Account Management.
- In the sub-menu, CLICK on Find/Add Staff.
- Click on the New Staff button.
- Before adding new staff, search for the staff member to ensure that he/she does not already have an account. This avoids duplication.
Add New Staff from the Provider Setup and Location Detail Pages
- Search for the staff to ensure that an account has not already been set up.
- Enter Search criteria or click on the first letter of the user’s last name in the Alphabet bar to open the staff list for that letter.
- All “Name” fields will return results that contain the letters you enter.
- If you enter a complete Date of Birth (mm/dd/yyyy), the search results will include only exact matches.
- If the person is not already set up, CLICK on New Staff.
NOTE: Please remember to always search for an existing user's account before you create a new user account. If a staff person had an account at another business entity, that account will not display on this list, but you will get a message that they have an existing account when you try to Save.
HCBS Find/Add Staff: View LMHA Check box
For the Health & Community Based Services (HCBS-AMH) Provider Agencies and the Recovery Management Entities, the system will hide the View LMHA check box. This will avoid the providers viewing or accessing client information. If the providers want to access each other’s client information, then they can share the client information through Consent.
NOTE: The view LMHA check box is only available to the LMHA’s and State Hospital providers.
If you do not find an existing account for the person, go to the Add New Staff page.
There are three tabs on this page:
- Staff Information tab – Under this tab you are required to enter the appropriate response for Title, First Name, Last Name, Email Address.
- Location/Roles tab – You are required to enter the appropriate response for Location and Roles for the staff. Don’t forget to CLICK on Add before you Save.
- Credentials tab – Under this tab you will be required to enter the appropriate credentials, along with Begin and End dates. Don’t forget to CLICK on Add before you Save.
Enter the Person Information – Complete all the required data fields under this tab and the optional information applicable to you or the user account you are setting up.
Title (Required)
- TYPE in the person’s job title.
- This field is limited to 30 characters.
Prefix and Suffix (Optional)
- Select one from each drop down list if applicable.
First, Middle, Last Name (Required)
- TYPE in the user’s First, Middle, and Last Name.
Date of Birth (Not Required)
- TYPE in the person’s birth date.
- When eight (8) numbers are entered, CMBHS will automatically format them into the date format mm/dd/yyyy. Or, you can type the forward slashes yourself.
Enter the User’s Access information:
- Select a radio button for Account Status (Initiated, Disabled, Enabled, Expired).
- Account Status is automatically set to “Initiated” when a new password is created;
- Account Status can be changed to “Disabled” for staff that no longer require system access.
Enter the User’s Contact Information:
Office Phone and Extension (Optional)
- Document the staff’s office or cell phone number according to the preference of your business entity.
- TYPE in the 10 numbers and CMBHS will format the phone number for you.
- The extension can be letters and/or numbers.
Phone Type (Optional)
- Indicate the type of phone by selecting one of the answer choices from the drop down list.
Other Phone and Extension: (Optional)
- Phone number automatically formats when 10 numbers are entered.
- The extension can be letters and/or numbers.
Email (Required):
- Enter the office email address.
- There must be characters before and after the @ symbol.
- Email address is mandatory field and will be used as User ID for IAM Online login.
- Email address cannot be changed or updated once user account is saved in system.
- This field is uneditable.
- Bulk Updates of an Email address: In this scenario, an external user has changed his email domain, as an example, from Yahoo to Gmail.
- The user will need to inform IAMO and Okta of the email change since the solution will require changes on both Okta end as well as CMBHS end. IAMO to confirm the solution.
- To add an Email address, you can use following domain email addresses.
- com
- .net
- .gov
- .us
- .in
- .org
- .edu
- .care
- .life
- .co
- Multiple Accounts for State Hospitals: HHS State Hospital users are HHS employees, so they are authenticated against Active Directory. These users need to access multiple State Hospitals, hence, require multiple CMBHS accounts.
- To request multiple CMBHS accounts, here is the proposed work around:
- Access to the first State Hospital account can be requested via the state email address. For this IAM team needs to add a role named State Hospital with location name for every hospital. User will select required hospital location and submit request which will go through the approval process.
- For subsequent accounts to access other state hospital locations, user will be created by the DSS team using their personal emails of any Yahoo or Gmail domain e.g. LastName.FirstName.Hospital1@gmail.com, LastName.FirstName.Hospital2@gmail.com, etc. These users will be considered external users due to one-email-one-account rule.
- Provider with 1 email address accessing several Locations: Providers can access only one Location with an email address. To access multiple locations, the Providers will need multiple email addresses. An email address is tied to a specific location.
- Duplicate Email Addresses: In case the user has multiple accounts with same email address (duplicate email), with the new functionality of having unique email address, user will need to have email addresses with Alias. E.g., test.lisa+1@test.com, test.lisa+2@test.com, test.lisa+3@test.com
Assign the Person to Location(s) and Role(s) (Required)
- Click on the New Role button.
- Begin by selecting the first location where the person needs access from the dropdown list.
- Click the check box if this is the staff member's primary location.
- Select one or more Roles that the user will have for each location.
- Next, select their primary role at that location.
- The Primary Location is the default Location for the user when they log in to CMBHS.
- One or more locations can be selected for each user. Only create locations for the user if they work at the location or with the program and have a need to access client records.
Designate the Primary Location (Required):
- If this is the user’s primary location, CLICK in the Primary Location checkbox.
- Whether the user works at only one location or at more than one location, it is still necessary to designate a Primary Location.
- Only one location can be selected as a Primary Location.
- To change Primary Locations, edit the location marked as Primary by selecting it, CLICKING Edit, unchecking Primary Location, and CLICKING Add. You can then select and Add another location to denote as the Primary Location.
After you have entered the user’s information, complete the following in the designated sequence.
Account Status
- Account status is automatically set to “Initiated” when a new password is created.
- The account status can be changed to “Disabled” for staff who no longer require system access.
CMBHS User Account Statuses
Initiated – The CMBHS Security Administrator has set up an account for this person, created a user name, and entered a temporary password. The user has never logged in to CMBHS.
Enabled – This is the status of a user who has an “active” account in CMBHS. This user has logged into the system at least one time.
Disabled – The user’s account is closed and they can no longer access CMBHS. The account can be reset to Initiated by the CMBHS Security Administrator.
Expired – This status is not currently active in CMBHS.
Contact Information
Enter the User’s Contact Information into the following data fields.
- Office Phone and Extension
- Document the staff’s phone number.
- The phone number automatically formats when 10 numbers are entered.
- The extension can be letters and/or numbers.
Phone Type
- Indicate the type of phone by selecting one of the answer choices from the dropdown list.
Other Phone and Extension:
- Phone number automatically formats when 10 numbers are entered.
- The extension can be letters and/or numbers.
Email:
- Enter the office email address.
- There must be characters before and after the @ symbol.
- Email address is mandatory field and will be used as User ID for IAM Online login.
- Email address cannot be changed or updated once user account is saved in system.
- This field is uneditable.
- Bulk Updates of an Email address: In this scenario, an external user has changed his email domain, as an example, from Yahoo to Gmail.
- The user will need to inform IAMO and Okta of the email change since the solution will require changes on both Okta end as well as CMBHS end. IAMO to confirm the solution.
- To add an Email address, you can use following domain email addresses.
- com
- .net
- .gov
- .us
- .in
- .org
- .edu
- .care
- .life
- .co
- Multiple Accounts for State Hospitals: HHS State Hospital users are HHS employees, so they are authenticated against Active Directory. These users need to access multiple State Hospitals, hence, require multiple CMBHS accounts.
- Provider with 1 email address accessing several Locations: Providers can access only one Location with an email address. To access multiple locations, the Providers will need multiple email addresses. An email address is tied to a specific location.
- Duplicate Email Addresses: In case the user has multiple accounts with same email address (duplicate email), with the new functionality of having unique email address, user will need to have email addresses with Alias. E.g., test.lisa+1@test.com, test.lisa+2@test.com, test.lisa+3@test.com To request multiple CMBHS accounts, here is the proposed work around: Access to the first State Hospital account can be requested via the state email address. For this IAM team needs to add a role named State Hospital with location name for every hospital. User will select required hospital location and submit request which will go through the approval process. For subsequent accounts to access other state hospital locations, user will be created by the DSS team using their personal emails of any Yahoo or Gmail domain e.g. LastName.FirstName.Hospital1@gmail.com, LastName.FirstName.Hospital2@gmail.com, etc. These users will be considered external users due to one-email-one-account rule.
How to set up Locations and Roles
- On the Locations/Roles Tab, begin by selecting a Location and then the Roles associated with each location.
- Select one or more roles that the user needs at each location
- Primary Location (checkbox): This will be the default Location for the user when they login to CMBHS.
Business Rules
- You may list one or more locations for each user. Only create locations for the user if they work at the location or have another need to access client records at the location.
- Whether the user works at only one location or at more than one location, it is still necessary to designate a Primary Location.
- Only one location can be selected as a Primary Location.
- To change Primary Locations, you must first edit the location marked as Primary by selecting it, CLICKING Edit, unchecking Primary Location, and CLICKING Add. Then you can select or Add another location to denote as Primary Location.
- On the Locations/Roles Tab, begin by selecting a Location and then the Roles associated with each location
- Select one or more roles that the user will have for each location.
- Primary Location (check box): This will be the default Location for the user when they login to CMBHS.
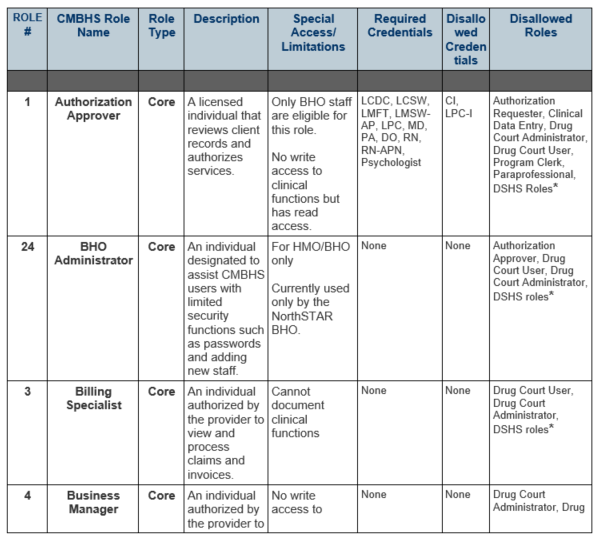
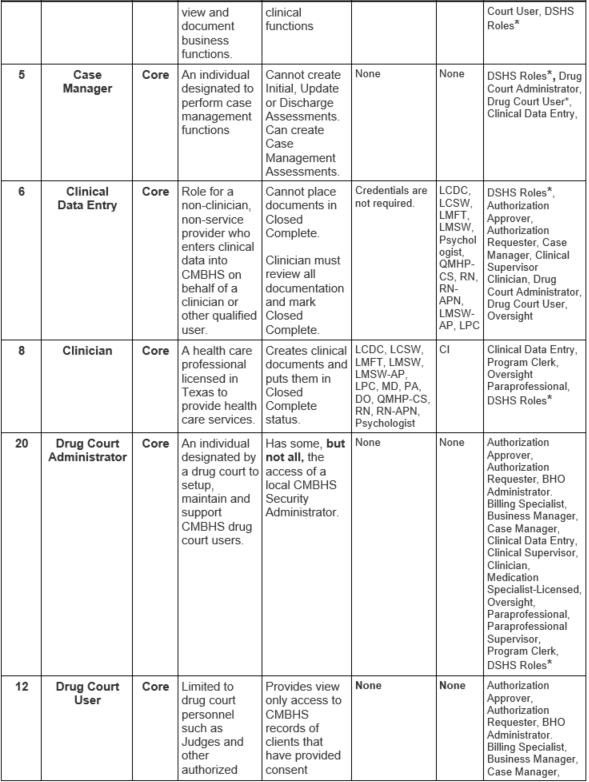
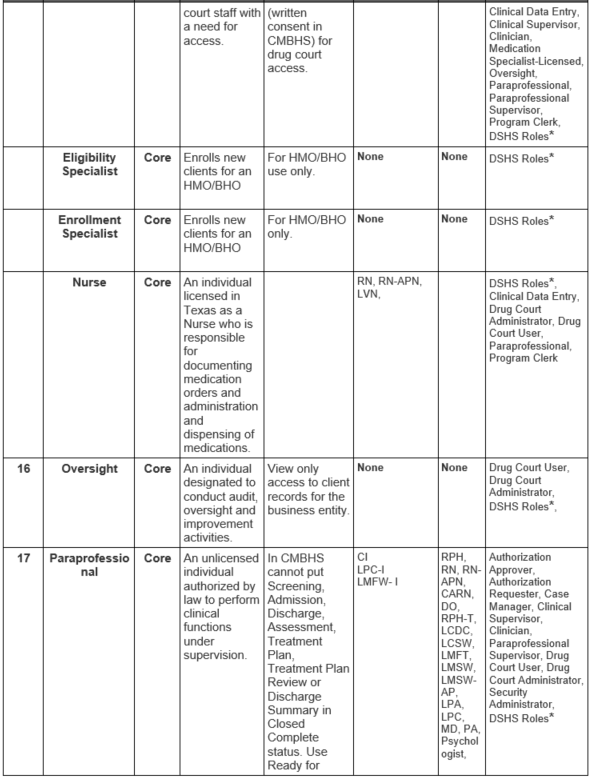
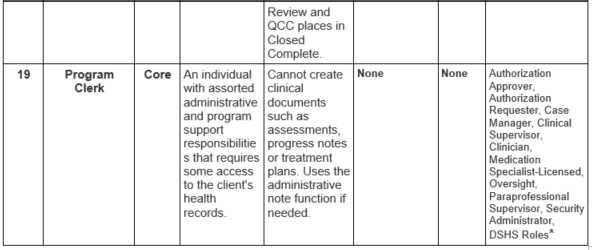
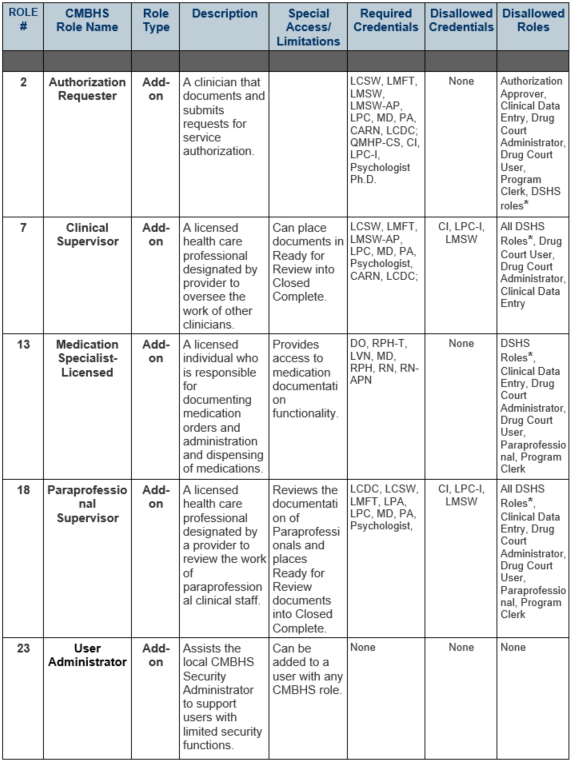
How to Assign CMBHS Roles to Staff
Use the following guide to assist in selecting the appropriate roles for staff.
STEP 1: Assign a Core Role to The User
- Pick the CMBHS CORE role from the table below that matches the person’s primary job duties. Grant a role that only provides the level of access that is needed — no more.
- Ensure that the person has the required credentials for the role. Enter the person’s “highest” credential. Do not document extra credentials that are not required for his/her job or role.
- These roles are for business entity/provider staff only. They cannot be assigned to HHSC staff.
STEP 2: Assign Add-On Roles
- Determine if any ADD-ON roles are needed.
- You can assign more than one ADD-ON role to a person.
- Ensure that the individual has the credentials required for the ADD-ON role, if any.
- These roles are for business entity/provider staff only. They may not be assigned to HHSC staff.
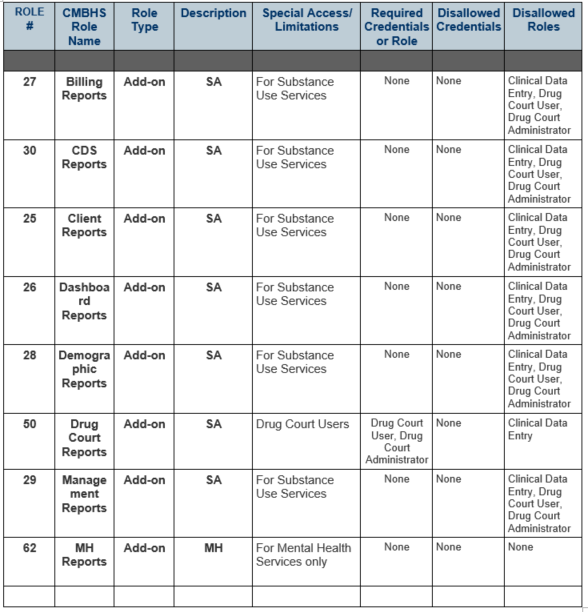
STEP 3: Does the person need Report Roles?
- You may assign more than one Report Role per person.
- Credentials are not required for Report Roles.
- These roles may be assigned to business entities/provider staff and HHSC staff.
Credentials
After adding roles to the individual’s account, staff’s licenses and certifications must be documented in CMBHS. Add the user’s credentials only if the individual will be assigned a role that requires credentials. The individual and the provider business entity are responsible for ensuring that all regulatory requirements for service documentation, staff supervision, and any other requirements are met and documented as required.
A "View LMHA Network" function in the CMBHS staff setup ensures that certain mental health (MH) users have all the functions available to them in CMBHS that they had in CARE. CMBHS MH users — designated by their provider as needing this ability — can see all the MH records of a client, including historical records migrated from CARE and all other MH records in CMBHS.
The function does not allow access to the client's substance use services records — those are controlled by client consents and CMBHS roles.
The "View LMHA Network" check box is located on the Location/Roles tab of the Staff Profile. It will display at MH provider locations, UM-MH locations, and UM-BHO locations. This field does not display at any other CMBHS location types.
This function can only be enabled or disabled by a business entity's local CMBHS Security Administrator. It can be enabled when creating the account, or at any other time, and can be disabled at any time as well.
How to Document Staff Licenses and Certifications
- Select the person’s license or certification by highlighting it in the dropdown list.
- Enter the person’s “highest” credential. Do not document extra credentials that are not required for the job or role.
- Enter the Begin and End Dates for each.
- And then CLICK on the Add button. The credential and the dates will display in a table.
- Repeat for other licenses and certifications.
- When all the information about credentials has been entered under all three (3) of the tabs, CLICK on the Save button and then on OK in the “Successfully Saved” message.
NOTE: The provider is responsible for ensuring that all regulatory requirements for supervision are met and documented as required by law.
Business Rules for Credentials
Certain documents in CMBHS can only be created by a user who has been assigned a certain role and has the corresponding required credentials. The ability to create and edit these documents is impacted by the proper entry of the credentials in CMBHS and by expired credentials.
These rules and the requirement for the entry of valid credentials in CMBHS is applicable to documents in any status, including Draft.
A user whose credentials have expired can still log into CMBHS and can view and write to pages that are not “role/credential required.”
A user whose credentials have expired can create and save “role/credential required” pages, but ONLY if the Performed on Date is between the Begin Date and End Date of a valid credential in CMBHS. If the user’s credentials were not valid on the Performed on Date, the “role/credential required” page will not be saved in any status.
Credentials are never edited or deleted from existing CMBHS pages. If a user’s credential expires, existing documentation that required a “role/credential” to create are not impacted by the expiration.
CMBHS will not enforce a duplicate check for credentials so documentation of past credentials may be maintained on the list. Each updated credential is added as a new credential. When the same credential is being added for the second time (or multiple times) the End Date for the second credential must be greater than the date of the current or expired credential in order to be saved.
Only the user’s active credential(s) display on the documents created by the user.
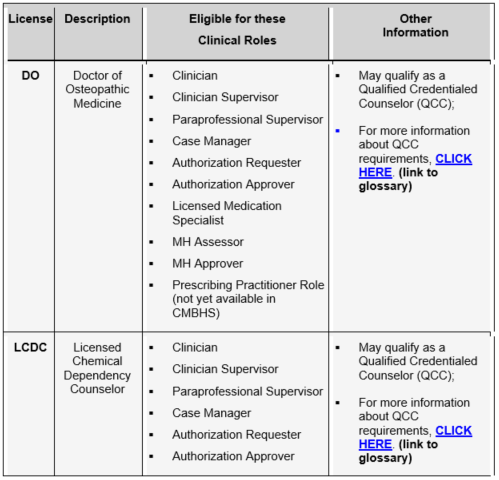
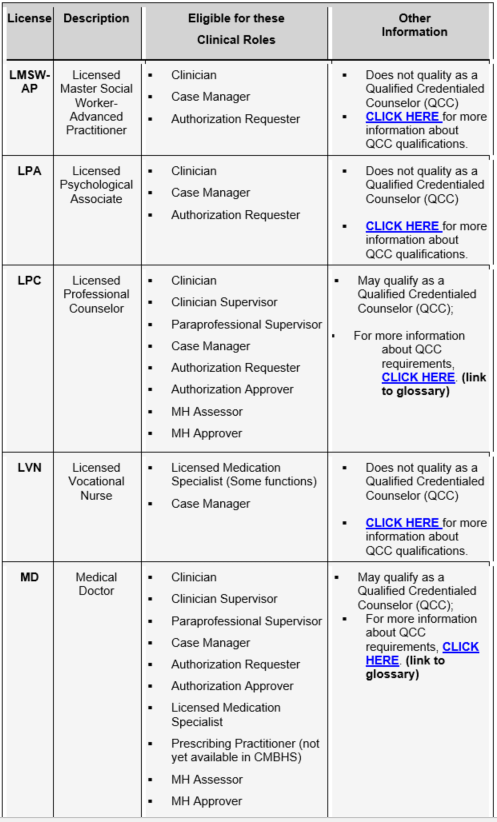
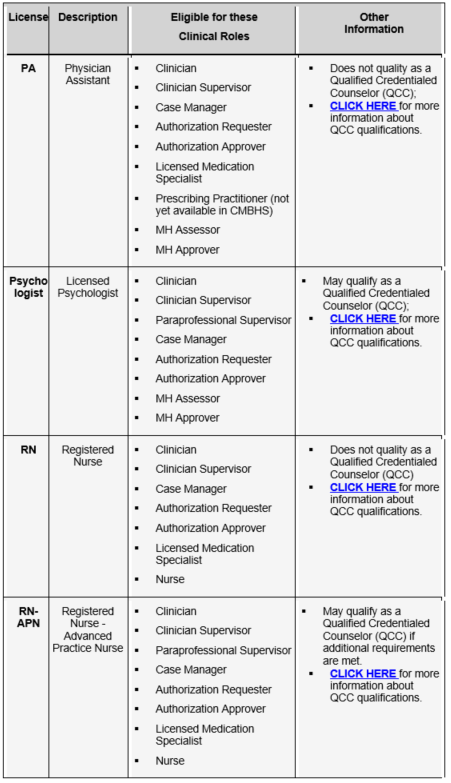
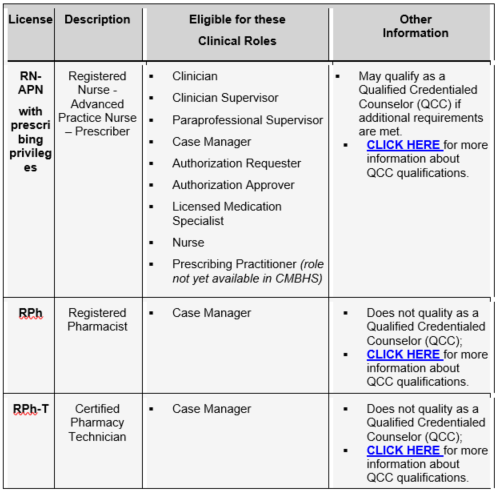
Credentials and Eligible Roles

Additional Information About Certain Credentials
Licensed Master Social Workers (LMSW)
Individuals with the Licensed Master Social Worker credential should be set up with the CMBHS role of Clinician. A person with the LMSW credential is not a QCC, but they can function as one if they have appropriate supervision defined in the Texas Occupations Code (TOC). The paraprofessional role in CMBHS is not the appropriate role for these individuals.
The CMBHS paraprofessional role is set up to be consistent with the Texas Administrative Code (TAC) for Licensed Chemical Dependency Counselors (LCDC) Counselor Interns (CI) — not for non-QCC staff member types, such as the LMSW. The provider needs to ensure that each non-QCC staff member receives appropriate supervision for their credential type, which will not be the same requirements as for the LCDC CI.
Some of the CMBHS supervision functions (such as the Ready for Review document status) are available for use by a person with the role of Clinician, but not required, as in the paraprofessional role.
Qualified Credentialed Counselors (QCC)
A Qualified Credentialed Counselor is a licensed chemical dependency counselor (LCDC) or one of the practitioners listed below who is licensed and in good standing in the State of Texas, to the extent that such individual is acting within the authorized scope of the individual's license, including:
- (A) licensed professional counselor (LPC)
- (B) licensed clinical social worker (LCSW)
- (C) licensed marriage and family therapist (LMFT)
- (D) licensed psychologist
- (E) licensed physician
- (F) licensed physician's assistant (PA)
- (G) certified addictions registered nurse (CARN)
- (H) advanced practice nurse recognized by the Board of Nurse Examiners as a clinical nurse specialist or practitioner with a specialty in psychiatric-mental health nursing.
This information is from the Texas Administrative Code (TAC).
NOTE: Do not forget to CLICK on the Add button after you enter the license information.
NOTE: Remember, credentials drive access to clinical documents and functions. If staff cannot access pages and functions they need, please review the credential/s entered in their profile and check expiration dates.
Ongoing Maintenance
The majority of the maintenance functions for the Texas Health and Human Services (HHSC) Clinical Management for Behavioral Health Services (CMBHS) are performed by staff at HHSC. This includes making changes to CMBHS secondary to changes in the HHSC contract, changes in laws, and funding requirements by state or federal agencies. This chapter of the Help addresses only the changes the local CMBHS Security Administrator makes on an occasional basis.
Updating Business Entity/Provider Information
- Login to CMBHS and go to your administrative/parent location.
- Begin by opening the Provider Detail page from the Administrative Toolbar at the top of your screen. Select Business Office and then select the Provider/Location Detail submenu.
- CLICK on the Edit button to open the page in Read-Write mode, which means you can make changes to the information that has already been entered.
- Make the necessary changes in any field on any tab.
- Then CLICK on the Save button. The “Successfully Saved” message will appear. CLICK on OK.
NOTE: Only HHSC Administrators and local CMBHS Security Administrators have Read and Write access to these pages.
How to Update Location Information
- Login to CMBHS and go to your local/clinic location.
- Open the Location Detail page from the Administrative Toolbar at the top of your screen. Hover over Business Office and then CLICK on Provider/Location Detail.
- Click Edit to open the Location Detail in Read-Write mode. This means that you will be able to make changes to the information that has already been entered.
- Make the necessary changes and then CLICK on Save.
- The Successfully Saved message will appear. CLICK OK.
Updating User Account Information
Finding a User’s Account
- Before you search for user information, make sure that you are in the correct Provider Location for the staff. If you are not at the correct location, change your location.
- From the Administrative Toolbar at the top of the page, select Account Management and then from the submenu, select Find/Add Staff.
- On the resulting Find/New Staff page, enter the Search Criteria or CLICK on the first letter of the user’s last name in the alphabet bar to open the list of users whose names begin with that letter.
- After entering in all the information, CLICK on the Search button. Your results will display in the table below.
How to Edit Staff Information
- CLICK on the row of the user in the Search Results grid to select the person.
- Then CLICK the Staff Detail button to open the user’s record in read-only mode.
- CLICK the Edit button to open the record in read-write mode. You can make changes to the user’s documentation on any of the three tabs — Staff Information, Location/Roles, and Credentials.
- CLICK the Save button.
- Then CLICK on Save.
NOTE: CLICK on Staff Search to return to the search page and find another user.
How to Change a User’s Status
Each user entered into CMBHS is given one of these Account statuses: Initiated, Disabled, Enabled, and Expired. The statuses can be changed in the Access section of the Staff Information tab.
User Account Statuses:
- Initiated – The user is new to the system and has not yet logged in to CMBHS and changed his/her temporary password to a user selected password.
- Disabled – User-designated status selected when a user no longer requires access to CMBHS.
- Enabled – This status is a CMBHS system-generated status; a user’s status will automatically set to Enabled when the user changes his/her initial password; this status is not user selectable.
- Expired – This status is not currently activated in CMBHS.
- If the user’s status is Enabled and you wish to end the user’s access to CMBHS, CLICK on the Disabled Account Status radio button.
- If the user’s status is Disabled and you wish to re-establish the user’s access to CMBHS, CLICK on the “Initiated” Account Status button.